|
|
 |
Remove Kick Starter, Plastic Cover, and outer case. It is NOT NECESSARY to drain oil as there is no oil behind the cover. |
|
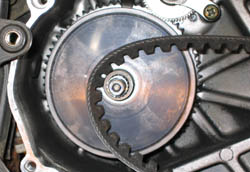
Be careful when removing the outer case and you will not tear the gasket. Item on left is Variator Item on right is clutch |
 |
 |
Remove 17mm nut The variator will want to turn, have some one hold it or use an impact wrench. (Cheap Electric impact wrenches are available at places like Harbor Freight and Tools. They are worth their weight in gold!) Remove nut, washer, claw washer, and fan. |
|
Now you can slide the belt off crank shaft. Be careful not to lose small washer on end of crankshaft sleeve. Then you can remove back part of variator. |
 |
 |
Be careful not to remove this piece which is behind variator. |
| Place rollers into sliding sheave |
 |
 |
Put Cam over sliding sheave and carefully slide onto crank shaft |
| Place Washer back onto shaft. The washer IS NOT A GOVENOR! For proper working it must be there. |
 |
 |
Put on belt and then fan and claw washer. Please note the amount of spline on crankshaft is getting less as you add items. This is normal. |
|
Place funny looking washer on crank shaft, There will be just enough splines left for this to engage splines. It is critical that all items that are splined engage the splines on crankshaft. This is not difficult, just requires paying attention. |
 |
 |
Put on flat washer and then 17mm nut |
| Done! |
 |
 |
Exploded diagram of Variator |